Get Solutions

Finding solutions with Technologies

Step by Step Procedure for Install and Configure and Securing a new cPanel Server and csf server through WHM

First Install cPanel on the new server
root@server [~]# mkdir /home/cpins
root@server [~]#cd /home/cpins
root@server [~]#wget http://layer1.cpanel.net/latest
after this give screen command
root@server [~]#screen
If it works then OK ,but if did’nt work use
root@server [~]#yum install screen (Install all the dependencies with it )
now give screen command
root@server [~]#screen
after that give ‘ll’ or ls and you will see the file as ‘latest’
root@server [~]# ls

latest
change permission to 755
root@server [~]#chmod 755 latest
and then after give this command
#sh latest
After Installation you need to configure your WHM by login to http://yourip:2086
Now Harden/Secure the server :-
Steps to Harden server :-
Install csf as almost 80 % of your server can be secured by installing csf :-
Steps to install csf :-
Download CSF script from
root@server [~]http://www.configserver.com/free/csf.tgz
Untar File
root@server [~]tar -xzxf csf.tar.gz
Install using following command
root@server [~]sh /csf/install.sh
That’s it! Wait for installation to finish.
Once you finish with the installation login to WHM by http://yourip:2086
WHM >> Plugins >>Config Server Security and Firewall >> Click on “Check Server Security” and from here you can increase the rating which will secure your server.
Further you can optimize your httpd and mysql by adding some manual entried in httpd.conf and my.cnf file respectively
Go to /etc/httpd/conf/httpd.conf file by your favorite editor but before that do take the backup of your files
root@server [~]# cp /etc/httpd/conf/httpd.conf /etc/httpd/conf/httpd.conf-bk
Now Go to /etc/httpd/conf/httpd.conf file
root@server [~]# nano /etc/httpd/conf/httpd.conf
and add the following entries :-
Timeout 90
KeepAlive On
MaxKeepAliveRequests 200
KeepAliveTimeout 5
StartServers 8
MinSpareServers 5
MaxSpareServers 20
ServerLimit 1200
MaxClients 1200
Save and exit and restart apache service
root@server [~]# /etc/init.d/httpd restart
Now go to /etc/my.cnf but before that take a backup of it
root@server [~] cp /etc/my.cnf   /etc/my.cnf-bk
root@server [~] nano /etc/my.cnf
Add the following entries :-
[mysqld]
datadir=/var/lib/mysql
socket=/var/lib/mysql/mysql.sock
skip-locking
max_connections=500
query_cache_limit=1M
query_cache_size=16M
query_cache_type=1
max_user_connections=25
interactive_timeout=10
wait_timeout=10
connect_timeout=10
thread_cache_size=128
key_buffer=16M
join_buffer=1M
max_allowed_packet=16M
table_cache=1024
record_buffer=1M
sort_buffer_size=2M
read_buffer_size=1M
max_connect_errors=10
thread_concurrency=8
myisam_sort_buffer_size=32M
server-id=1
local-infile=0

[mysqld_safe]
open_files_limit = 8192

[mysqldump]
quick
max_allowed_packet=16M

[mysql]
no-auto-rehash

[isamchk]
key_buffer=32M
sort_buffer=32M
read_buffer=16M
write_buffer=16M

[myisamchk]
key_buffer=32M
sort_buffer=32M
read_buffer=16M
write_buffer=16M

[mysqlhotcopy]
interactive-timeout
Save and Exit and restart mysql service
root@server [~] # /etc/init.d/mysql restart


More Details Click 
    author by:http://blog.hostonnet.com 

Step by Step Procedure IPv4 NAT Gateway and DHCP on Ubuntu 12.04 Server


The setup is simple: a single Ubuntu server will act as a gateway and DHCP server for a local network. All other machines on the local network will receive their IPs from the DHCP server. To make things easier, I’ll call this Ubuntu server “Skyray” for the rest of the post.
Skyray has two network interfaces, eth0 and eth1. eth0 is on the 10.20.30.0/24 subnet and this is the Internet facing interface. eth1 is on the 172.22.22.0/24 subnet, where all other machines are also present. Basically, eth0 will connect to the Internet and eth1 will serve DHCP requests and act as the gateway.

/etc/network/interfaces

First you need to configure eth0 and eth1 for Skyray. Edit the file and make sure it has at least the following settings (or whatever settings are appropriate for your environment).
sudo vim /etc/network/interfaces
auto lo
iface lo inet loopback

auto eth0
iface eth0 inet static
    address 10.20.30.77
    netmask 255.255.255.0
    gateway 10.20.30.1
    network 10.20.30.0
    broadcast 10.20.30.255
    dns-nameservers 10.20.30.15 10.20.30.16
    dns-search codeghar.com

auto eth1
iface eth1 inet static
    address 172.22.22.1
    netmask 255.255.255.0
    network 172.22.22.0
    broadcast 172.22.22.255

/etc/sysctl.conf

You need to enable IPv4 forwarding. To do so, edit this file.
sudo vim /etc/sysctl.conf
And uncomment the line
# net.ipv4.ip_forward=1
so that it now appears as
net.ipv4.ip_forward=1
Save the file and run the following command to make the change effective without a reboot.
sudo sysctl -w net.ipv4.ip_forward=1

/etc/rc.local

You’ll need to allow iptables rules for NAT to work. Edit the file and save it.
sudo vim /etc/rc.local
Make sure the following two lines appear before the exit 0 line in the file.
/sbin/iptables -P FORWARD ACCEPT
/sbin/iptables --table nat -A POSTROUTING -o eth0 -j MASQUERADE
To make these iptables rules active without rebooting, run the following commands:
sudo iptables -P FORWARD ACCEPT
sudo iptables –-table nat -A POSTROUTING -o eth0 -j MASQUERADE

Install DHCP server

sudo aptitude install isc-dhcp-server

/etc/dhcp/dhcpd.conf

Configure your newly installed DHCP server. Edit the file and save.
sudo vim /etc/dhcp/dhcpd.conf
The file is very well commented and you can learn a lot reading it. Just make sure it has at least the following configuration.
ddns-update-style none;

# option definitions common to all supported networks...
option domain-name "codeghar.com";
option domain-name-servers 10.20.30.15, 10.20.30.16;

default-lease-time 3600;
max-lease-time 7200;

# If this DHCP server is the official DHCP server for the local
# network, the authoritative directive should be uncommented.
authoritative;

# Use this to send dhcp log messages to a different log file (you also
# have to hack syslog.conf to complete the redirection).
log-facility local7;

# This is a very basic subnet declaration.

subnet 172.22.22.0 netmask 255.255.255.0 {
  range 172.22.22.21 172.22.22.250;
  option routers 172.22.22.1;
}

/etc/default/isc-dhcp-server

We want to serve DHCP only on eth1 interface to we need to configure it that way. Edit the file and save it.
sudo vim /etc/default/isc-dhcp-server
The line will look like this before you change it
INTERFACES=""
And after you change it, it will look like this:
INTERFACES="eth1"
Now you should stop and start the DHCP server.
sudo service isc-dhcp-server stop
sudo service isc-dhcp-server start

Conclusion

Now any machines you have on the 172.22.22.0/24 network will get their IP address from Skyray if they are set to DHCP.


More Details Click
     Author by :-codeghar.wordpress

Step by Step for multipule interface dhcp server installation on ubuntu 12.04


Scenario:
Ubuntu dhcp server with 3 network cards (eth0,eth1,eth2), eth0 is connected to upstream server, in order to get the internet access, eth1 is connected to the 10.10.10.0/24 subnet and serve as dhcp server  while eth2 serve for 172.16.10.0/24 subnet.
Before configuring the dhcp server on Ubuntu, we shall check the ip address setting on our Ubuntu server:
sudo nano /etc/network/interfaces


Ubuntu as DHCP Server:
To install dhcp server, enter the following command at a terminal prompt:
sudo apt-get install isc-dhcp-server

We have more than one network card(s) in our Ubuntu server, so we need  to select the network card(s) on which our server will be listen for dhcp request. (By default, it listens on eth0 but we want to change it to eth1 and eth2).
We can change this by editing  /etc/default/isc-dhcp-server file:
sudo nano /etc/default/isc-dhcp-server

Change “eth0” to the interface(s) on which we want that our server will listen for dhcp request (In this case, it’s eth1 and eth2):

It’s always a good practice to make a backup copy of /etc/dhcp/dhcpd.conf file:
sudo cp /etc/dhcp/dhcpd.conf /etc/dhcp/dhcpd.conf.bak 

Now we will change the default configuration by editing /etc/dhcp/dhcpd.conf, I normally delete everything inside the file and manually add the configuration that suits my needs :-)
sudo nano /etc/dhcp/dhcpd.conf

Here is my dhcpd.conf file, you need to change it according to your needs:
ddns-update-style none;
authoritative;
log-facility local7;

subnet 10.10.10.0 netmask 255.255.255.0 {
 option routers 10.10.10.1;
 option subnet-mask 255.255.255.0;
 option broadcast-address 10.10.10.255;
 option domain-name-servers 10.10.10.1;
 option domain-name "eth1.lan";
 default-lease-time 600;
 max-lease-time 7200;
 range 10.10.10.10 10.10.10.100;
}

subnet 172.16.10.0 netmask 255.255.255.0 {
 option routers 172.16.10.1;
 option subnet-mask 255.255.255.0;
 option broadcast-address 172.16.10.255;
 option domain-name-servers 172.16.10.1;
 option domain-name "eth2.lan";
 default-lease-time 600;
 max-lease-time 7200;
 range 172.16.10.10 172.16.10.100;
}

Restart dhcp service using the following command:
sudo service isc-dhcp-server restart 

Confirm the IP Address on Windows 7 that connect to eth1:

Confirm the IP Address on Windows XP that connect to eth2:

To Check the DHCP Leases on Ubuntu Server:
sudo tail /var/lib/dhcp/dhcpd.leases

 More details click
                            author by-rbgeek.wordpress

Step by step for install and configure setuo of appserv on windows 2008 seerver

Step 1: Get the file
At the time of writing this article, there are 2 version;
  1. 2.4.x contains PHP 4 and most software are older versions so it’s more stable.
  2. 2.5.x contains PHP 5 and most are newest releases at the official sites so it’s supports more function, but may less stable than 2.4.x.
It’s up to you to decide which is suitable for you.
  • Get download by go to developer site.
  • Or if you don’t want to go to the site, you can download 2.5.7 at here.
Step 2: Installation
2.1 When you finished download, double-click the file. The welcome screen will be shown, click Next.
Set up appserv
2.2 Click ‘I Agree’ to accept the license agreement.
2.3 Choose the directory where you want to install AppServ, I use the default one.
click Next.
2.4 Choose the components to install, click Next.
2.5 This is apache configuration.
The server name use ‘localhost’ so you can access at http://localhost.
Specify admin’s e-mail and port for apache. (recommend to leave 80 as it’s default)
2.6 Now configure MySql, enter password for root account. Also, you can choose charset at here.
Then click Install. The installation will start.
2.7 Now installation is finished, you can run Apache and MySql now by click Finish or if you want to run it later uncheck the box that you want.
2.8 To verify that installation is complete, simply open http://localhost (or any server name that you provide while set up). The page will look similar this.
That’s it. Now you have your own web server just in few minutes.

more details click

Step by Step for install and configure setup Apache web server using XAMPP on Windows

Step-by-step

  1. Download XAMPP for Windows. Browse to www.apachefriends.org/en/xampp.html and click XAMPP for Windows.
    XAMPP for Windows
  2. Scroll down to Download section, there are 3 formats which you can choose to download. In this example, I select ZIP format.
    Download XAMPP
  3. Unzip the file into the folder of your choice. If you extract XAMPP in a top level folder like “C:\” or “D:\”, you can skip to step 5. Otherwise, you have to run “setup_xampp.bat” in \xampp folder. In this example, I extract to C:\ so I can skip to step 5.
    Unzip XAMPP
  4. Here is the screenshot of the execution of file setup_xampp.bat.
    setup_xampp.bat
  5. Open XAMPP Control Panel by right-click on xampp-control.exe and select Run as administrator.
    Note: If you’re using Windows XP, you just double-click on the file.
    Open XAMPP Control Panel
  6. On XAMPP Control Panel Application, select Svc checkbox of Apache and click OK. This will install Apache as a service on this computer.
    Install Apache as service
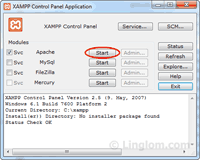
  7. Click Start to start Apache web server.
    Start Apache
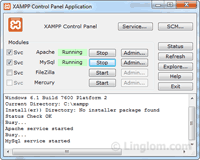
  8. Repeat step 6-7 on MySQL. Now Apache and MySQL are installed as Windows services and already started.
    Apache and MySQL services started
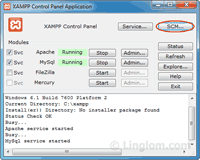
  9. You can check if the services are really installed on the computer by click SCM.
    Open Windows Services
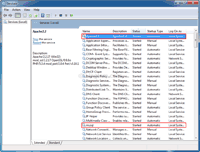
  10. On Services, you will see Apache and MySQL services are started and startup type are set to Automatic which means that services will be started automatically when the computer starts.
    Windows Services
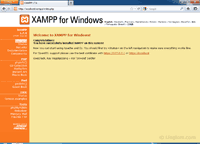
  11. Now it’s time to test, browse to “http://localhost” or “http://127.0.0.1″. You will see the screen as below. This is XAMPP’s splash screen, select English language.
    XAMPP Splash Screen
  12. Here is the XAMPP’s main page. You can view other pages using navigation menu on the left side. For example, XAMPP’s status to see which components are running, security page to view current security configuration of the XAMPP installation, etc.
    XAMPP's Main Page
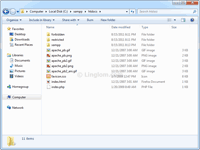
  13. The main directory for all WWW documents is \xampp\htdocs. If you put a file “test.html” in this directory, you can access it with the URI “http://localhost/test.html”.
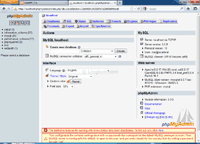
  14. You can manage MySQL using phpMyAdmin by browse to “http://localhost/phpmyadmin” or you can select phpMyAdmin link on the XAMPP’s main page (in Tools section).
    Note: By default, the root’s password is empty (blank password).

more details click

How to use shutdown ubuntu 12.04 command under Linux

How do I use shutdown command?

The shutdown command can be used to turn off or reboot a computer. Type the command as follows to shutdown server / computer immediately:
$ sudo shutdown -h now
OR
$ sudo shutdown -h 0

How do I shutdown compute at specific time?

To shutdown computer at 6:45pm, enter:
$ sudo shutdown -h 18:45 "Server is going down for maintenance"
At 6:30pm message will go out to all user and 6:45 system will shutdown.
Please note that you can also use halt or poweroff or reboot command for stopping and restarting the system:
$ sudo halt
OR
$ sudo poweroff

more details click

Install and Configure Join AD domain on Ubuntu 12.04 Server Step by Step Procedure

 Join AD domain
Required software
You need to install the winbind and samba packages. The packages smbfs and smbclient are useful for mounting network shares and copying files.
IconsPage/IconNote.png The package smbfs is optional, but includes useful client utilities, including the smbmount command. Also useful is thesmbclient package, which includes an FTP-like client for SMB shares.

Join
The first step in joining the Active Directory domain is to edit /etc/samba/smb.conf:
file:  /etc/samba/smb.conf 

[global]
        security = ads
        realm = LAB.EXAMPLE.COM
        password server = 10.0.0.1
# note that workgroup is the 'short' domain name
        workgroup = LAB
#       winbind separator = +
        idmap uid = 10000-20000
        idmap gid = 10000-20000
        winbind enum users = yes
        winbind enum groups = yes
        template homedir = /home/%D/%U
        template shell = /bin/bash
        client use spnego = yes
        client ntlmv2 auth = yes
        encrypt passwords = yes
        winbind use default domain = yes
        restrict anonymous = 2

IconsPage/IconNote.png Adding valid users = @"Domain Users" to the [global] section will allow all Domain Users to see all of the shares avaliable without a password. This is the equivlient to allowing "Everyone" to read all shares. If you want to restrict reading a share then you will have to specify valid users for that share. 
IconsPage/IconNote.png The "winbind use default domain" parameter is useful in single-domain enterprises and causes winbind to treat any username that isn't qualified with a domain name as a username in the domain to which winbind is joined. Omit this parameter if you are concerned about confusion between local accounts on your systems and accounts in the default domain. The "winbind separator" directive is optional, and the default value is the usual backslash "\" Domain and User separator. You can use "+" if you know of a specific reason "\" will not work in your environment.
Be sure to restart the Samba and Winbind services after changing the /etc/samba/smb.conf file:

sudo /etc/init.d/winbind stop
sudo /etc/init.d/samba restart
sudo /etc/init.d/winbind start

Request a valid Kerberos TGT for an account using kinit, which is allowed to join a workstation into the AD domain. Now join to the domain, if the ticket was valid you should not need to supply a password - even if prompted you should be able to leave it blank.
IconsPage/IconNote.png This next step gave me the error: kinit(v5): Cannot resolve network address for KDC in realm LAB.EXAMPLE.COM while getting initial credentialseven though nslookup win2k3 and host 10.0.0.1 would both return the correct entries. To correct this problem, I had to edit my/etc/hosts file and add the following to it: 10.0.0.1   win2k3.lab.example.com

sudo kinit Administrator@EXAMPLE.COM
sudo net ads join
Using short domain name – LAB
Joined 'linuxwork' to realm 'LAB.EXAMPLE.COM'

IconsPage/IconNote.png If the Kerberos auth was valid, you should not get asked for a password. However, if you are not working as root and are instead using sudo to perform the necessary tasks, use the command sudo net ads join -U username and supply your password when prompted. Otherwise, you will be asked to authenticate as root@LAB.EXAMPLE.COM instead of a valid account name.You can also supply a password if you don't want to get prompted. Just use net ads join -U <username>%<password> for this. Maybe it's useful for unattended installations where you want to add machines to an AD automatically.
IconsPage/IconNote.png If your Active Directory server is not running DDNS as well (eg. if you're running a separate DNS server) you may get the error:

sudo net ads join
Failed to join domain: failed to find DC for domain LAB.EXAMPLE.COM

To fix this, specify the AD server to the "net join" command:

sudo net ads join -S WIN2K3 -U <username>%<password>

You'll get a warning about not being able to update DNS, but you will successfully join the AD!

Testing

IconsPage/IconNote.png Using a clean install of 10.04, I did not have to modify any PAM files to get authentication working. I had to edit common-session to get the home directories created, but that is it.

Setup Authentication
nsswitch
file: /etc/nsswitch.conf

passwd:         compat winbind
group:          compat winbind
shadow:         compat

IconsPage/IconNote.png I needed to add hosts:  files dns to /etc/nsswitch.conf to avoid the settings in /etc/hosts to be ignored.
IconsPage/IconNote.png Don´t forget to restart winbind again after editing /etc/nsswitch.conf!!!
Testing
You can check that the Domain has successfully been joined by:

wbinfo -u

You should get a list of the users of the domain.
IconsPage/IconNote.png I needed to make shadow:  compat winbind in /etc/nsswitch.conf to make wbinfo -u work.
And a list of the groups. Be patient these queries can take time.

wbinfo -g

Check Winbind nsswitch module with getent.
IconsPage/IconNote.png This step may or may not work. If you only see local users, try connecting with a Windows machine anyways. (Tested under Ubuntu 9.10 x64)

sudo getent passwd

root:x:0:0:root:/root:/bin/bash
...
LAB+administrator:x:10000:10000:Administrator:/home/LAB/administrator:/bin/bash
LAB+gast:x:10001:10001:Gast:/home/LAB/gast:/bin/bash
...

Note that the domain name (here, "LAB+") is displayed by getent only if you have not set winbind use default domain = yes in smb.conf.

sudo getent group

root:x:0:
daemon:x:1:
bin:x:2:
...
LAB+organisations-admins:x:10005:administrator
LAB+domänen-admins:x:10006:manuel,administrator
LAB+domänen-benutzer:x:10000:
LAB+domänen-gäste:x:10001:
LAB+linux-admins:x:10004:manuel
...

PAM
With this config you can access the workstation with local accounts or with domain accounts. On the first login of a domain user a home directory will be created. This PAM configuration assumes that the system will be used primarily with domain accounts. If the opposite is true (i.e., the system will be used primarily with local accounts), the order of pam_winbind.so and pam_unix.so should be reversed. When used with local accounts, the configuration shown here will result in a failed authentication to the Windows/Samba DC for each login and sudo use. This can litter the DC's event log. Likewise, if local accounts are checked first, the /var/log/auth.log will be littered with failed logon attempts each time a domain account is accessed.
Note: You can use pam-auth-update to add the necessary entries for winbind authentication.

sudo pam-auth-update

This PAM configuration does not acquire a Kerberos TGT at login. To acquire a ticket, use kinit after logging in, and consider usingkdestroy in a logout script.
file: /etc/pam.d/common-account

account sufficient       pam_winbind.so
account required         pam_unix.so

file: /etc/pam.d/common-auth

auth sufficient pam_winbind.so
auth sufficient pam_unix.so nullok_secure use_first_pass
auth required   pam_deny.so

IconsPage/IconNote.png On a Ubuntu 7.10 (Gutsy Gibbon) and 9.04 (Jaunty Jackalope) systems, these changes to pam.d/common-auth result in not being able to log in as a local user, for example by ssh. Your luck may be better, but test immediately just in case.
This one allows login for AD users and local users (tested with Ubuntu 9.10)
file: /etc/pam.d/common-auth

auth sufficient pam_unix.so nullok_secure
auth sufficient pam_winbind.so require_membership_of=domänen-admins use_first_pass
auth requisite  pam_deny.so
auth required   pam_permit.so
auth optional   pam_ecryptfs.so unwrap

IconsPage/IconNote.png ecryptfs does not work with AD users. Login is successful with local users and AD users which are members of AD groupdomänen-admins
file: /etc/pam.d/common-session

session required pam_unix.so
session required pam_mkhomedir.so umask=0022 skel=/etc/skel

file: /etc/pam.d/sudo

auth sufficient pam_winbind.so
auth sufficient pam_unix.so use_first_pass
auth required   pam_deny.so

@include common-account

Final configuration
Each domain needs a directory in /home/.

sudo mkdir /home/LAB

One last thing
If you want to be able to use an active directory account to manage your Ubuntu box, you need to add it to the sudoers file. For that, you will need to edit the file /etc/group an add your username to the admin group and whatever other group you need(plugdev,audio,cdrom just to mention a few). it will be like:

.......
admin:x:117:olduser,ActiveDirectoryUser
.......

Where, olduser, is your current linux user and, ActiveDirectoryUser, is the new administrator. Another way to make a Domain Group a sudoer in your ubuntu is to edit the file /etc/sudoers (using the command 'visudo') and add the following line

%adgroup        ALL=(ALL) ALL

Where, adgroup, is a group from your active directory. Keep in mind that spaces in the group name are not allowed. You can use '%domain\ admins', without quotes.
Usage
Logon with DOMAIN+USERNAME, unless you included "winbind use default domain" in your smb.conf, in which case you may log in using only USERNAME.

login: root
Password: *****


Automatic Kerberos Ticket Refresh
To have pam_winbind automatically refresh the kerberos ticket
Add the  winbind refresh tickets  line to  smb.conf :
file:  /etc/samba/smb.conf 

#       winbind separator = +
        winbind refresh tickets = yes
        idmap uid = 10000-20000

And modify /etc/pam.d/common-auth:
file: /etc/pam.d/common-auth

auth sufficient pam_winbind.so krb5_auth krb5_ccache_type=FILE
auth sufficient pam_unix.so nullok_secure use_first_pass
auth required   pam_deny.so

Troubleshooting
If the Winbind PAM module in /var/log/auth.log says that the AD-user is not existing restart winbind. It might be best to restart the whole workstation.

sudo /etc/init.d/winbind restart

If when logging into the machine one gets a "no logon servers" error winbind\samba may not be starting properly. Try restarting them manually, and then logging in.
-If a manual restart works, then to fix this issue one needs to change scripts S20samba and S20winbind to S25samba and S25winbind in the /etc/rc2.d, rc3.d, rc4.d, rc5.d folders. The understanding is that this causes samba and winbind to startup later in the boot order for each runlevel. So that they start after S24avahi-daemon. If you then find that you must wait a bit before you can log in, you need to set "winbind enum users" and "winbind enum groups" in /etc/samba/smb.conf to 'no'.
name service cache daemon
The name service cache daemon (nscd) can interfere with winbind, as winbind maintains its own cache. Remove it.

sudo apt-get remove nscd

Some names or groups are resolved with getent, but others are not
The range of your idmap parameter is not wide enough to encompass all the users or groups

idmap uid = 16777216-33554431
idmap gid = 16777216-33554431

Adding more than one Linux machine to a Windows network
The above procedure allows you to add as many Linux machines as you like. However, the UID assigned to a given user may not be the same across all the machines. It created file ownership & rights issues when files/folders are shared between these machines. See Question #21806 on https://answers.launchpad.net/ubuntu/ for details. Therefore it is advisable to specify the UID mapping method

idmap backend = rid:YOURDOMAIN=70000-1000000
idmap uid = 70000-1000000
idmap gid = 70000-1000000
winbind use default domain = yes
security = ADS

The newer syntax is (with old style you can get NT_STATUS_OBJECT_NAME_COLLISION in /var/log/samba/log.winbindd)

idmap domains = YOURDOMAIN
idmap config YOURDOMAIN:backend = rid
idmap config YOURDOMAIN:range = 70000-1000000
winbind use default domain = yes
security = ADS